MP Molds was featured in Handloader Magazine. Here are the pages of the article. Read the article online: MP Bullet Moulds (Handloader Magazine). More press coverage on our Press page.


MP Molds was featured in Handloader Magazine. Here are the pages of the article. Read the article online: MP Bullet Moulds (Handloader Magazine). More press coverage on our Press page.

After many requests, we are proud to present MP machine molds. Fit Magma and Ballisticast casting machines. Options and pricing on request. Interested? Contact us for options and pricing.
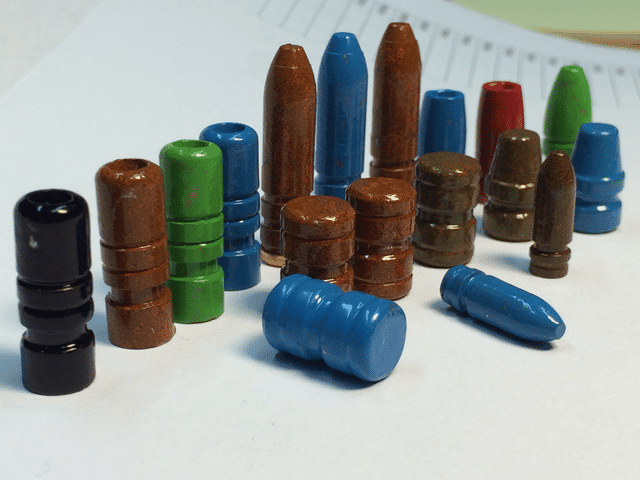
The simplest way to powder coat cast pistol and rifle bullets: shake them with powder in a plastic container, then bake. Step-by-step guide by Gregor Hodnik (Gamsek). This is the method I use to powder coat (PC) my cast bullets, because it worked so well from the very first try. It can also be called ASBBDT, “dry tumbling with AirSoft BBs as tumbling media”. After getting good results with DT, I never looked back at a spray gun (ESPC, electrostatic powder coating). ESPC can give the smoothest finish, but it needs more setup and cleanup, and some powder is lost. Other methods (piglet method, Hi-Tek with acetone, DT variants that bake in a pile and drop into water) are not covered here. At a glance Container: plastic with a snap-on lid and a triangle with #5 on the bottom. Batch: 30–100 bullets, 1 teaspoon of powder for the first load, ½ teaspoon after that. Coat: swirl 30 seconds, shake up and down 30 seconds. Bake: convection oven at 400F / 200C for 20 minutes (15 if preheated). What you need Powders. Start with powders already proven for DT. Then there’s no preheating, vibratory tumbler or acetone washing: just 60 seconds of shaking and swirling, and no second coat if you follow the instructions. Plastic container #5 with a snap-on lid (like cool whip containers). The #5 plastic is very important for the static charge, and a round shape makes swirling easier. Convection oven with a fan, for even heat and an almost sprayed look. Airsoft BBs (optional, but recommended). Blue nitrile gloves. Other gloves remove powder wherever they touch. Long needle-nose pliers or tweezers (or long medical forceps). Gregor uses tweezers with bent tips. Which powder? I took the easy way and learned from other casters’ tests instead of experimenting with random local powders. On the Cast Boolits forum (castboolits.gunloads.com), member Smoke4320 tested powders from big companies and made a list of powders that work with DT. He is now a vendor sponsor in the USA. Even from Europe (postage, customs) I ordered his powders twice and never regretted it: after 3 years I still use powders from the first shipment. I’d recommend anyone in the USA to start with his “DT tested” powders. Orders: 704-624-4115, smoke@paintballkingdom.com, or the forum thread. Why use Airsoft BBs? Smoke’s powders work without them (depending on the colour), but I almost always use BBs. They cushion my relatively soft lead bullets, improve the static charge and remove excess powder, which gives a perfect coating. Black BBs work best; my yellow and orange work well too. Very smooth white BBs were useless. Know your oven Make sure you know the real temperature your oven bakes at (mine was off, as expected). If you can’t measure it, bake a few small batches of 10 bullets until you find the setting that gives a nice, even flow. Too cool and you get clumps, too hot and you melt lead. Step by step Cover the bottom of the #5 container with 2–3 layers of Airsoft BBs (about ½” deep). Add 30–100 bullets: about 100 small ones like .223, or only about 30 large ones like 45 ACP 230 gr. Add 1 teaspoon of powder for the first load with new BBs and container, ½ teaspoon for later batches. Less is better: you can always add more. Close the lid, swirl like crazy for 30 seconds, then shake hard up and down for another 30 seconds. Always finish with shaking. With some powders or high humidity, shake up to 2 minutes. Check the coverage. If there’s no powder left at the bottom and coverage isn’t good enough, add a bit more and repeat. Pick the bullets up one at a time with tweezers or a nitrile glove, tapping off excess powder into the container (or just blow it off). Dip the tweezer tips or glove fingertips into powder first, so they don’t leave marks. A strainer works too. Place the bullets on a tray lined with non-stick foil or parchment paper (it lasts many cycles). Silicone baking mats also work. Bake at 400F / 200C for 20 minutes (15 minutes in a preheated oven). Take them out and let them cool, or quench them in water. Water quenching: if you quench bullets straight from the mould, baking the powder coat cancels that first quench, so quench them again after they come out of the oven. Why powder coat? Replaces lube: less mess, not sticky, clean seating dies. Often faster and cheaper than Alox or a lubrisizer: push-through sizers are enough. Doesn’t dry, melt or crack in long-term storage. Less or no smoke, easier cleaning, no lead exposure when handling. Lower friction, longer barrel life, lower temperature. Colour coding for different loads with the same bullet. Usually works in bullet feeders for progressive presses. Adds 0.002″–0.003″ to the diameter if you need it, and lets you use soft alloy. Works in suppressors and won’t clog compensators or ports. Hate colours? Use clear PC for the traditional look. Tips and troubleshooting Fit is king PC isn’t the answer to every problem (leading, tumbling). You still need to fit your cast bullet to your bore. Above all, don’t use undersized bullets. Size before or after coating? It depends on the diameter you need. Sometimes I size, attach the gas check and then coat; with tight gas checks I seat them first, then coat (and size again if needed). For 9mm, .38/.357 and .44 I often coat first and then size. A push-through die should never scratch your bullets: if it does, polish it. The hammer / vice test Pound a freshly coated bullet with a hammer and squeeze another in a vice. No flaking or peeling? Congratulations, your coating passed. Still lead in the barrel? How much did you flare the case mouth? It may shave coating off while seating. Load a dummy round, pull it apart and check. Measure that pulled bullet, especially in 9mm with its tapered case: the

A caster’s field report: how Gregor Hodnik (Gamsek) went from iron moulds and a gas burner to casting with seven MP brass moulds, and what he learned along the way. I began casting with brass moulds when I got my first HP mould, made by MP Molds, work of Miha Prevec. Before that, I was using traditional iron moulds with the ladle/pot method and a gas burner. My previous experience was only with 9mm and 7mm RCBS moulds: a 2 cavity that was too slow for my needs, and a non HP version that was fine for target work but useless for any kind of hunting. Since then I have built my own bottom-pour casting furnace with PID and bought a bolt gun in 300 AAC BLK just to shoot cast. On my first sessions with brass moulds I paid no attention to alloy temperature and didn’t preheat the moulds. Once I started doing both, my results improved immensely and I got usable bullets very fast. Here is what worked for me. What worked for me Preheat the mould on a hot plate and control the alloy temperature (PID furnace). Heat cycle new moulds a few times. Results get better with every session. Long HP pins need extra heat: cast fast and don’t stop, and re-preheat at the first sign of sticking. Don’t pour straight onto the pins, aim slightly off center. With 6 cavity moulds, alternate front-to-back and back-to-front. My MP moulds 30 cal 314140 Sledgehammer, penta & round HP/FP (4 cav) 312440 Hammer of Thor, HP/FP (4 cav) H&G #38 Ness safety bullet, deep HP/FP (2 cav) 312159 308 Hunting GC, HP/FP (4 cav) .224 / 5.56mm 227-65 GC, solid (4 cav) 9mm 9mm SWC H&G #278 clone, bevel base (6 cav) 9mm RNSWC, bevel base (6 cav) Casting experience, mould by mould 314140 Sledgehammer (PB, HP/FP) I started with stick-on wheel weights with about 20% pure lead: about 10 kg of melted, cleaned and fluxed lead on a gas burner. It was my first time with a brass HP mould, and it was only slightly pre-warmed on the edge of the pot. After 20 pours I had only wrinkled bullets, then suddenly perfect bullets, all keepers. The short penta pins didn’t cause any sticking; they actually helped the bullets drop out faster. Once the mould was in its ideal temperature range, I just kept casting. H&G #38 Ness safety bullet (GC, HP/FP) With its very long pins, this 2 cavity mould was at first an exercise in frustration, because neither the mould was preheated nor the alloy at the right temperature. It’s the only mould that really needed my full attention to alloy temperature and pin heating: if the HP pins aren’t hot enough, the bullets stick to them. What worked: preheat the mould really well, until the lead takes about 10 seconds or more to solidify on the sprue plate. Miha recommended 415C / 780F and I used that. Then cast fast and don’t stop. At the slightest hint of sticking, stop and preheat again. Don’t pour directly into the center, so the alloy doesn’t hit and cool the long pins. 312440 Hammer of Thor (PB, HP/FP) I never had any problems casting these HP rifle bullets. None of my first brass moulds were heat cycled, but every session gave better results. I always preheated it, and by the third session the bullets basically dropped out as soon as I opened the mould. Easy casting, a real pleasure. 312159 308 Hunting (GC, HP/FP) I heat cycled this new mould 3 times, and after the first 15 pours, without any special attention to the middle-length pins, I got usable bullets. It is the most accurate 30 cal bullet I have, and it shoots fine both subsonic and supersonic in my Ruger Ranch 300 AAC Blackout (1:7 twist). It doesn’t feed from the Ruger’s magazine, which is made for long pointy bullets, but from what I’ve read it works fine in various AR-15s. It also shoots and feeds excellently in my friends’ bolt action Savage Axis and Sako 85, both .308 Win. 180-SIL (solid, GC) I also tried 180-SIL bullets cast by a friend, and they worked perfectly in every sense: feeding from my magazine and hitting the target. 227-65 GC (.224) I cast a few hundred of these. Sized to .226, with a Hornady gas check and powder coat, they came out at 63 grains. Tikka Hunter .223 Rem (1:8 twist): about 380 m/s (1250 fps) and a decent group at 63 m despite the wind. Sako 85 Varmint .222 Rem (slow 1:14 twist): 6 gr of Trail Boss didn’t stabilize them, but 12 gr of Accurate 5744 at about 600 m/s (2000 fps) gave a very decent 20-shot group. So testing the 227-65 was successful without any load development. 9mm SWC H&G #278 clone (bevel base, 132 gr) A joy to cast. Once properly warmed, the 6 cavity mould was practically raining bullets. The only trick I needed was to alternate my casting front-to-back and back-to-front. I started at 390C / 735F, poured a few times, then dropped to 360C / 680F. 9mm RNSWC (bevel base) Drops 135 gr with Lyman #2 and 140 gr with 50% pure lead / 50% wheel weights + tin. My latest mould: just a few heat cycles on a hot plate, proper lubing, and not a single problem. I only had to raise the alloy temperature to 370C / 700F, because it was 10C / 50F in my basement with an open window and the spout froze too often. Expansion and deformation tests I shot 30 cal bullets into water, wet soft paper and ice. These are the results. Targets I also shot a lot of bullets at targets, from field positions or from a portable table with a rest, with my Ruger Ranch in 300 AAC BLK, mainly at subsonic velocities. Written by Gregor Hodnik (Gamsek)

Check out this video about our molds and our dedication to perfection, and see how an MP mold is assembled. Looking for a mold? Browse our CNC-machined bullet molds.

A simple trick for easier release of hollow point pins. Tip: take a soft graphite pencil and “paint” the part of the HP pin that comes in contact with the lead. More casting tips: General advice for using brass HP (hollow point) moulds.

A practical guide to casting with brass hollow point moulds: from cleaning and heat cycling a new mould to finding the right casting rhythm. By experienced caster Gregor Hodnik (Gamsek). Quick reference Alloy: wheel weights + pure lead (50/50) with 2% tin. For powder coating: pure lead with 2% tin. Alloy temperature: 750F / 400C for rifle HP, 680F / 360C for non HP pistol moulds. A guidance, not a rule. Preheat: on a hot plate with the pins inserted, 20–30 minutes for long HP pins. Rhythm: fill, count to 3, open the sprue plate, count to 3, open the mould and dump. 1. Before the first casting Clean and assemble Clean the mould with brake cleaner, including the pins and the screws that hold them. (Warm water works too, but Miha already removes oils and debris before shipping.) Assemble the mould with the HP pins you want to use. Back the HP pin screws off about 1/8 turn, so the pins don’t bind in the mould. Heat cycle a new brass mould Put the assembled mould (pins inserted) on a hot plate set a bit over half power and bring it to about casting temperature. Switch the hot plate off and let the mould cool by itself. Repeat three or four times. No need to take the mould apart. This starts building the patina, and casting keeps it growing. Patina prevents sticking, so bullets generally drop out. Lube the right spots Lube the screws that hold the HP pins and the pins that hold the mould in the handles. Optionally coat the HP pins with a graphite pencil, only the part that forms the hollow point. Repeat every 4–5 sessions. Put a single drop of sprue plate lube (included with your MP mould) on the shafts on the outside of the blocks. Just a drop, so the cavities stay clean. 2. Casting with an HP brass mould Preheat on a hot plate Heat the mould on a hot plate (slightly over medium) until it reaches casting temperature or the sprue plate lube starts to smoke a bit. This saves many warm-up pours: a properly preheated mould needs only 3–5 fills, and a non HP mould can be perfect from the first pour. Tip: the longer the pins and the larger the hollow point, the longer the preheat. The pins must reach temperature too, usually 20–30 minutes, while your furnace heats up. Add tin to the alloy Tin helps hollow point bullets expand and fills out an HP mould well. Gregor uses wheel weights + pure lead (50/50) with 2% tin in the final mix. If you powder coat, you can simply use pure lead with 2% tin. Temperature and pouring With a bottom-pour PID furnace: 750F / 400C for rifle HP, 680F / 360C for non HP pistol moulds. If the pins cool down, problems start. Especially at the beginning, fill the cavities generously, front to back, to keep the heat in. A hot pin is a trouble-free pin. You can raise the alloy temperature and balance overheating with your casting speed. Once you find the happy medium, casting becomes a pleasure. When bottom pouring, don’t pour straight onto the pins. Aim slightly off center so the alloy doesn’t hit and cool the pins. The longer the pin, the more important this is. Cutting the sprue After pouring, watch the lead change colour as it solidifies and wait for the small sink mark. Wait a couple more seconds, then tap the sprue plate with a wooden stick (Gregor’s is wrapped in leather). The cut should leave a clean, flat base. Smeared bases: you cut too soon. Sprue cuts hard: you waited too long. Bases not filled out: pour with more pressure (hold the mould closer to the spout or open the spout more), and pour enough lead to keep one big continuous sprue. A big sprue keeps the mould and pins hot. Can’t find the rhythm? Fill the mould, count to 3, open the sprue plate, count to 3, open the mould and dump. Repeat. Opening the mould With rifle HP moulds, wait a couple of seconds after cutting the sprue, then turn the mould upside down and tap on the bolt on the handles. Let the tapping open the mould first, then help with the handles. This also pushes the side pins out. MP Crammer-style pins pull the bullets out of the cavities as the mould opens. At the right temperature the bullets fall off the pins by themselves. If not (mostly with a blank FP pin), tap the handle bolt a couple of times. If it takes more than a few taps, the mould and pins are too cold. Watch the sprue and the bases Your casting tempo controls the mould and pin temperature more than the alloy temperature does. The sprue tells you where you are: After preheating and a few pours, the sprue puddle stays liquid for a couple of seconds. About 3 seconds to harden: you’re ready to cast. Tilt the mould after 2 seconds and the sprue still pours off like water; after 3 it doesn’t. 4 seconds or more: slow down, cool the mould, or lower the alloy temperature. Below 550F / 290C the furnace spout may freeze; above 750F / 400C the surface oxidizes quickly. Stay in the zone: keep your cadence and inspect the bullets only after you finish. Each mould has its own “preferences”, so note the alloy temperature, hot plate setting and preheat time for every mould. Alternate the casting direction Pouring hot alloy in the same direction in a 4 or 6 cavity mould creates hot and cold sections. The last filled cavity is usually the hottest and can smear. Alternate front-to-back and back-to-front. Watch the bases and slow down if needed. Cool a hot part of the mould with a wet cloth. Lube the sprue plate while casting Not strictly necessary, but it reduces wear and removes small lead particles. About 4–5 times per hour

Every MP mould is CNC machined. We make semi-custom moulds for cast bullets, in solid and hollow point designs. Here are the main specifications. Materials Mould blocks: brass, aluminium 2007 (2011 or 2024), and in some cases steel. Sprue plates: steel. Alignment pins: hardened steel. Design and cavities Single to eight cavity moulds, depending on the bullet design. Hollow point and solid bullet designs. Where the design allows, reversible hollow point pins, so you can cast HP or solid bullets in the same mould. Block dimensions depend on the bullet design. In theory we can make all kinds of moulds, but first we need to know the bullet design. Included and compatible RCBS/Lyman type top punches are included with all our moulds. Fits MP mould handles or LEE 6 cavity handles. Have a bullet design in mind? Contact us or browse our moulds.

 English English
 German
 French
 Spanish
 Swedish
 Czech
 Polish
 Italian